
It’s happened again: you hit the button to close your garage door, the light blinks, the system clicks, but nothing happens. Forced to get out of your vehicle, you manually shut the door and wonder what’s going on with your garage door safety sensor. It’s time to learn how to troubleshoot your garage door sensor!
The good news is, there are some simple steps to fix a faulty garage door sensor. By running through some quick diagnostics, you can troubleshoot your garage door safety sensor – and you may even be able to fix the issue yourself!
How do garage door sensors work?
Garage door safety sensors use a photo eye system to operate. This involves infrared sensors positioned on the bottom of each side of your garage door. The photo-eye lens passes a beam of light between each sensor.
When nothing is in the way to block this signal and a button is pushed to activate your garage door, an encoded binary number is sent to your garage door receiver that signals the garage door to open or close. If an object is blocking the infrared beam, the garage door safety sensor will prevent the garage door from closing.
How to test your garage door sensor
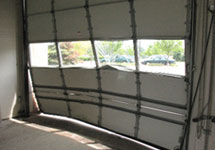
Some modern garage doors have self-diagnostic capabilities and you can easily check to see if the sensors are working. Take an object like a cardboard box and place it on the floor, intentionally blocking the sensor’s path. Push your door button and try to close your garage door.
If it closes all the way, your safety sensor is broken.
This means the garage door safety sensor did not properly detect the obstruction – and could cause damage or bodily harm! However, if the garage door starts to close, but reverses when it senses the object sitting in the way, your sensor is working!
Troubleshooting garage door sensors
Safety sensors on automatic garage doors have been part of federal law in the US since 1993 and they’re meant to protect people from getting hurt and prevent your property from being damaged. Troubleshooting your garage door sensors can involve many steps. Let’s address some of the most basic garage door troubleshooting tips.
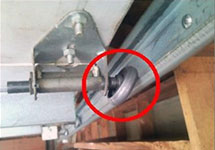
Cleaning Your Garage Door Sensors
Your garage door sensors are located just above the ground on the inside of your garage door track. The first thing you should do if your garage door safety sensor isn’t working is to wipe away any dirt, build-up, or debris that could be blocking the lens. As a first step, take a paper towel or a cloth and gently wipe the lens clean to make sure no debris is blocking the signal from being sent or received.
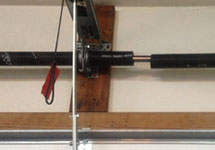
Garage Door Sensor Alignment
You should also check the positioning of your sensors. Sensors can easily be knocked out of alignment by storage items, lawn equipment, bikes, etc. If the sensors are out of alignment, your doors won’t work.
Make sure the bracket attaching your sensor is securely fastened to the track and that the unit is positioned so the light is shooting out horizontally over to the receiver on the other side. You can loosen the wing nut on the unit and wiggle it to reposition it.
Most receiving units have a green light and the sending unit will have an amber-colored light. The amber light should always be on – even if the sensors are misaligned. However, if the green light in the receiving unit isn’t on, it either indicates that it needs to be re-aligned, or that there could be an issue with your wiring. If you reposition the sensors and the green light comes back on, everything should work.
Check the Wiring
This DIY step is more advanced. If you feel that your garage door sensor wiring needs to be inspected, we recommend you contact our trusted garage door repair experts at The Door Company. However, if you’d like to conduct a basic self-inspection, remember to always turn the power off before checking your wiring!
Your garage door sensor may have wiring that goes into your walls and ceiling. Most often, there’s also wiring that runs from the sensors near the ground up along both sides of your garage door, across its top and parallel to the ceiling until it reaches the control box in the unit above.
First, inspect the wiring to see if there are any clear signs of damage. If there are exposed or frayed wires, stop and schedule a garage door repair!
If there are no signs of damage to the wires, the next step would be to do a pull test. A pull test is done by gently moving the wiring to check for any loose or unplugged circuits. If the light on your sensor flickers when you do a pull test to a certain area, then that is the part with an issue.
At this point, it’s recommended to consult a garage door repair professional. They can further inspect your garage door safety sensor wiring to see if they need to strip the wiring or do a full garage door sensor replacement.
Contact The Door Company
Fixing your garage door sensors so that everything functions as it should be easy – but at times, it could require some deeper knowledge to troubleshoot. If you’d like the peace of mind you get when working with an IDEA-certified garage door repair expert, we are here for you. The Door Company has a team of skilled, trained professionals on hand to help. Contact us today.